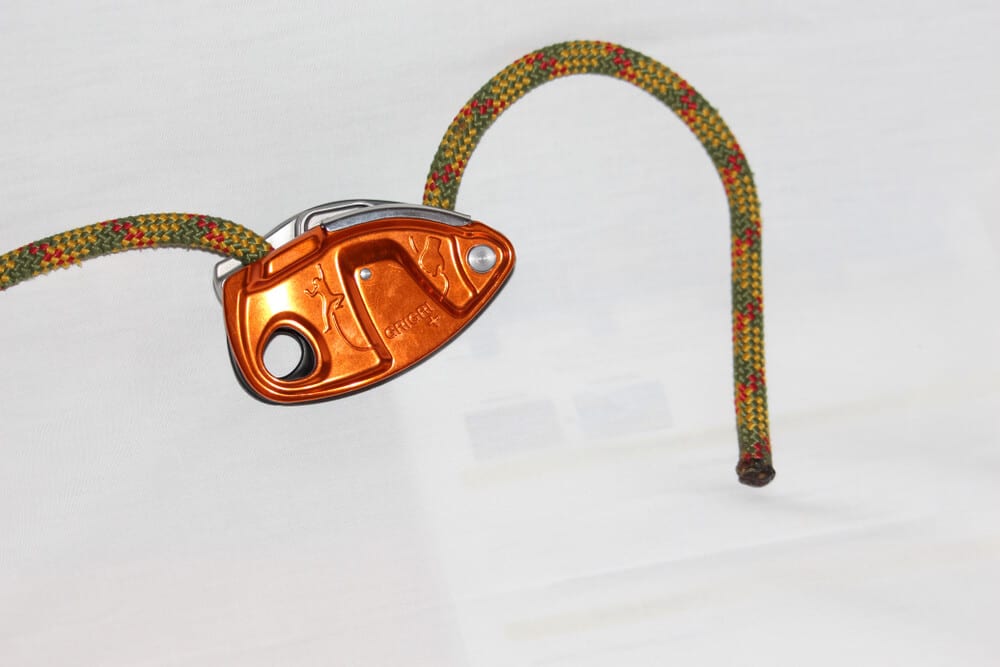
When it comes to climber’s kits, their belay device is one of the most important pieces. Nowadays, there are about as many belay devices as there are crag dogs. But few devices command a presence at the crag like the Petzl Grigri.
Upon its inception in the early 1990s, it changed the game with its assisted braking design. Since then, the Grigri has been a critical belaying and descending device for countless climbers, from budding top ropers to shirtless rock jocks. It has become an absolute cult classic in the climbing world and is largely the gold standard in the assisted braking device market.
Let’s take a deep dive into what makes the Grigri special and why everyone at the crag seems to be belaying with the Grigri.
Quick Grigri History
The Petzl Grigri is the brainchild of Petzl equipment engineers who wanted to design a belay device that could help reduce the risk of accidents while climbing. In particular, Petzl engineers wanted to create a device that helped add security to belaying, especially for new climbers.
Their inspiration for the device came from two places– the Petzl Stop, a self-braking descending device, and the Solo, a device designed for belaying oneself while rope soloing. Little by little, Petzl engineers blended facets of the two devices into a single device that could ostensibly assist the belayer in braking and lowering their climber.
As somewhat of a joke, one of Petzls engineers facetiously called the device a “grigri,
which they understood to be an African talisman or amulet that is believed to ward off evil spirits and bring oneself good luck. From that point on, the name stuck. Eventually, in 1991, the first generation of Petzl’s new belay device was ready for shipment. And the rest is history.
The Climbing World’s First Mechanical Assisted Braking Belay Device (ABD)
What Petzl released in the early 90s was the climbing industry’s first mechanical ABD. Prior to the Grigri, climbers belayed exclusively with old-school figure-eight devices or tube-style devices, like the original Black Diamond Air Traffic Controller (ATC). Some of the really old-school climbers may still have been belaying with “Sticht” plates.
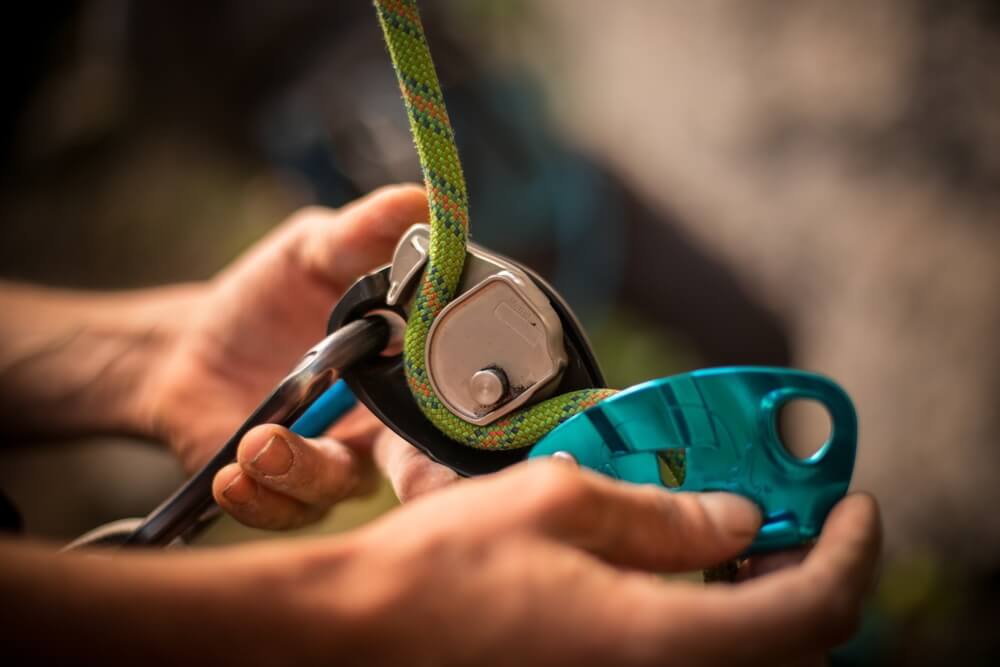
An ABD is a lever box belay device that does exactly what the name suggests– it assists the belayer in breaking the rope or catching a fall. It accomplishes this by pinching the rope with a steel mechanical camming device. The friction created by the camming device can then be modulated using the device’s handle so the climber can be lowered in a climbing scenario or so a climber can rappel down a single-strand rope in a rappeling scenario.
By pinching the rope, the device itself does most of the work of arresting falls. However, a competent belayer still must manage the device and maintain control of the brake strand with their dominant hand. In other words, the Grigri is not an automatic braking device. It only assists the belayer and should never be used hands-free.
Petzl Grigri Specs
For the gearheads out there, here are a few specifics about the Grigri.
- Materials: aluminum side plates, stainless steel camming mechanism, and friction plate, and reinforced nylon handle
- Weight: 175 grams
- Single Rope Compatability: the entire range is 8.5 to 11 millimeters, but the optimal range is between 8.9 and 10.5 millimeters
- Certifications: CE En 15151-1, UKCA, UIAA
- Available colors: Red, blue, gray
- Available models: Grigri and Grigri+
Pros and Cons of the Grigri
There is a lot to love about the Grigri, but there are also some drawbacks to the device. In my opinion, the following pros and cons are some of the most important. However, I’m sure there’s more to be said, depending on who you talk to.
Pros
- An assisted braking mechanism can mitigate risk from incorrect belay technique
- Can integrate with a wide spectrum of rope diameters
- It can be used to belay and rappel
- Once mastered, it can feed slack quickly and smoothly
- Creates less friction than a tube-style device when belaying in guide mode
Cons
- The learning curve for mastering the Grigi is steep and can be challenging
- It’s only applicable in climbing scenarios with one rope
- The Grigri is heavier than a lot of other belay decides
- The Grigri is more expensive than many other belay devices
- Caters toward right-handed belayers
Belaying and Descending with the Grigri
First and foremost, the Grigri is a belay device. Therefore, it’s most often used for belaying. So, let’s discuss how to use the Grigri for belaying and then talk about rappelling with it next.
Top Rope Belaying the Grigri
Grigris are great devices for top-rope belaying. Because most beginner climbers get into the sport via top-roping, the Grigri is the perfect complement for climbers who want to add more security to their top-rope belaying.
How to Top Rope Belay with a Grigri
- Remove the locking carabiner from the eyelet and slide open the swinging side plate of the Grigri
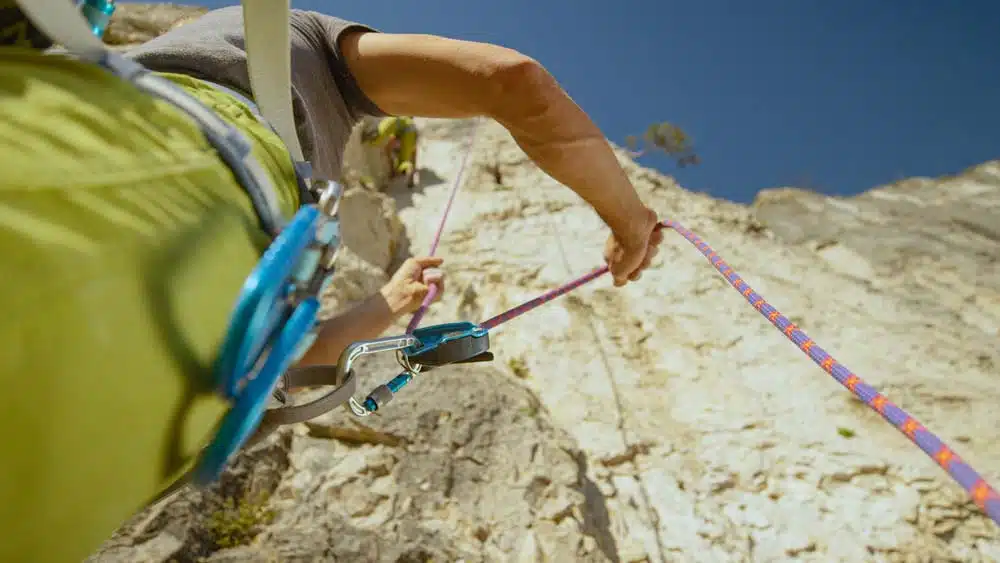
- Correctly position the climbing rope inside the Grigri so the climbing strand comes out of the top of the device (and heads up towards the anchor) and the brake strand of the rope spills out the front of the device (down towards the ground). Follow the pictograms for assistance.
- Close the swinging slide plate and clip the locking carabiner into the eyelet.
- Using the locking carabiner, clip the device onto the belay loop of the harness. Lock it.
- Perform double-checks of both the climber and belayer’s systems to ensure no mistakes were made before climbing.
- Follow routine climbing and belayer commands before leaving the ground.
- As the climber ascends, use the Pull-Brake-Under-Slide (PBUS) belay technique to remove slack from the system and keep the climbing rope taut. Always maintain control of the brake strand with the brake hand.
- After the climber reaches the top of the climb, take out all the slack and prepare to lower.
- Using your left hand, pull back the brake lever to release the camming mechanism. Never let go of the brake strand with your brake hand.
- Slowly and smoothly lower the climber to the ground in a controlled manner.
Lead Belaying with a Grigri

Grigri is also phenomenal devices for lead belaying. Assisted braking belay devices like the Grigri are advantageous for lead belaying because arresting falls safely in a lead climbing scenario can be much more complex than top-roping and the extra security you get from the ABD helps mitigate risk.
For example, in a particularly large or violent lead fall where the lead belayer may lose control of the brake strand (i.e., factor II fall in a multi-pitch scenario), the assisted braking function will likely still arrest the climber’s fall. However, this is not always the case, and Grigris can fail if the belayer loses control of the brake side of the rope.
Grigris are also great for lead belaying when the climber is projecting or climbing at their limit and falling a lot. That’s because the Grigri camming mechanism does most of the work regarding arresting the rope. This allows the belayer to relax and focus on providing safe and soft catches. Overall, belaying with a Grigri increases longevity because you don’t have to worry about death gripping the rope as you might with an ATC.
How to Lead Belay with a Grigri
- Remove the locking carabiner from the eyelet and slide open the swinging side plate of the Grigri
- Correctly position the climbing rope inside the Grigri so the climbing strand comes out of the top of the device (and heads up towards the anchor) and the brake strand of the rope spills out the front of the device (down towards the ground). Follow the pictograms for assistance.
- Close the swinging slide plate and clip the locking carabiner into the eyelet.
- Using the locking carabiner, clip the device onto the belay loop of the harness. Lock it.
- Perform double-checks of both the climber and belayer’s systems to ensure no mistakes were made before climbing.
- Follow routine climbing and belayer commands before leaving the ground.
- As the climber ascends, introduce slack into the system so the leader can climb unhindered by rope drag and so they can pull up the rope to clip their protection without being short-roped.
- After the climber reaches the top of the climb, take out all the slack and prepare to lower.
- Using your left hand, pull back the brake lever to release the camming mechanism. Never let go of the brake strand with your brake hand.
- Slowly and smoothly lower the climber to the ground in a controlled manner.
Descending with a Grigri

Besides belaying, the Grigri is also a descending device for rock climbing. This means that with a correctly built system, you can rappel with a Grigri from the top down.
Rappeling with a Grigri is different from a standard rappel. With a standard rappel, you descend on two strands of a single rope. In this system, your body weight is spread across two strands, which act like counterweights.
However, with the Grigri, you descend on a single strand, and you have no counterweight. This means that the single strange must be fixed to the rappel anchor. There are various ways to fix a climbing rope and rappel on a single strand with Grigri. I will not go into those details here.
Rappelling with Grigri
- Remove the locking carabiner from the eyelet and slide open the swinging side plate of the Grigri
- Correctly position the climbing rope inside the Grigri so the climbing strand comes out of the top of the device (and heads up towards the anchor) and the brake strand of the rope spills out the front of the device (down towards the ground). Follow the pictograms for assistance.
- Close the swinging slide plate and clip the locking carabiner into the eyelet.
- Using the locking carabiner, clip the device onto the belay loop of the harness. Lock it.
- Perform double-checks on the rappel system before committing your body weight.
- Once the system is secure, commit to the system like you would for a normal rappel with your legs out in front of you, sitting in your harness like a chair.
- Using your left hand, pull back the lever to modulate the friction created by Grigri’s camming device.
- With your right hand, maintain control of the brake strand. Never let go.
- Descend down the rope in a controlled manner.
- Modulate the pressure you pull down on the lever to slow down. Release the lever completely to stop.
Safety Considerations When Using the Petzl Grigri
Climbing is dangerous. Using the Grigri with the incorrect belay technique can cause serious injury or death. Therefore, you should learn to belay with a Grigri in a controlled scenario and under the supervision of a highly skilled mentor or professional climbing guide.
The Grigri Is Not a Hands-Free Device
I’ve said it once, and I will say it again– the Grigri is not a hands-free device. It is not an automatic-assisted braking belay device. The Grigri is designed to always be accompanied by a competent belayer whose primary job is to always maintain control and never let go of the brake side of the rope.
Follow Petzl’s User Guidelines
Like any piece of rock climbing equipment, it’s best practice to deploy the tool exactly how the device is intended to be used. Regarding belaying with the Grigri, Petzl has a super helpful webpage for learning proper belaying techniques.